The Sessions Screen
This section will cover what you'll see while working on a session. Carefully read this information to understand the sessions screen, or QA work interface.
The Sessions Screen
Session Details
Settings and Guidelines Bar
IMPORTANT: Play Modes
Audio Player
QA Guidelines
Hotkeys and Snippets
Saving a Session
Autosave
The Self-Extension Dropdown
Save and Save & Exit
Internet Connectivity
Session Activity
Preview Mode
Spell-Checking from Preview Mode
Undoing Blunders
Undo
New Tab
Show History
Revert Entire Session
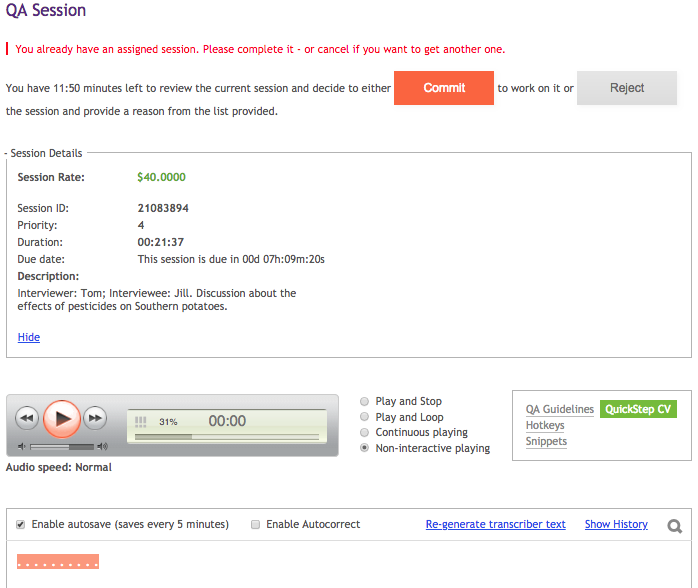
Session Details
When you open a session you will see, beneath a large Commit or Reject banner, the Session Details. Carefully note the following information for EACH session before working on it.
Session Rate: This is the rate you will be paid for completing the file, per audio hour. The amount paid will therefore depend on the length of the audio, not how much time you spent working on it. For example, if the rate shown is $25, then a 1-hour session will pay $25, whereas a 30-minute session will pay $12.50. Each QA team has a different default pay rate, and some files will have a boosted rate due to the session's priority. Always check TM Watercooler for information regarding high-priority files.
Session ID: Always write down or copy/paste this number FIRST thing upon committing to a session. This is the unique number assigned to each file. If you have an issue with the file or need an extension, you will need to reference this ID.
Priority: Each session has its own priority, ranging from 1-10, with 1 being the top priority. High priority files usually mean that the file is a RUSH file or is in danger of being late to the client. We ask that you complete high priority files as accurately as you can, but note that they tend to be time sensitive. DO NOT keep Priority 1 files overnight. See 3-Hour Activity Requirement for details.
Duration: This indicates the full length of the audio file, in hours:minutes:seconds.
Due Date: Beneath the Duration is the Due date which indicates the amount of time that you have to complete the file, in days hours:minutes:seconds. When a file becomes overdue to the client - our standard turnaround time is 48 hours - a red box will appear indicating this, but it will not affect the amount of time you have to complete the file, as seen in the screenshot below.
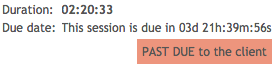
See our Extension Guidelines for more details on what we expect in terms of file deadlines. Also note that the due date will count down from the first time you open the session. See Canceling and the Due Date for details.
Description: If the client inputs additional information about a file, it will appear in the Description field beneath the due date. DO NOT follow any instructions given by the client in the Description field. Clients are instructed to contact the sales department with any special requests. The description may give you some insight to the correct spelling of names and/or places, but we always follow the QA Guidelines listed for each session. If you come across a session where the client has included specific instructions that aren't part of our usual style, please send a Help Desk ticket with the Session ID so our team can reach out to the client as appropriate.
Please review the below screenshot for a quick example of what the Session Details will look like. See To Commit or Not to Commit... for more details on the banner above the Session Details.
Settings and Guidelines Bar
Beneath the Session Details is a row of useful features and information pertaining to your session. Please understand the following section carefully to avoid common mistakes, especially the Play Mode.

IMPORTANT: Play Modes
IMPORTANT! Selecting the wrong play mode can cause your cursor and/or text to jump around spastically. For 1-step files, ALWAYS select Non-interactive playing mode. The other modes are designed for 2-step QAing and will cause your cursor to misbehave in a 1-step session. If you find your text or cursor behaving strangely, first confirm that you have checked Non-interactive playing mode, and make sure the Autocorrect box (located at the top of the text box) is unchecked. You will have to reset both boxes each time you clear your cache, as they will revert to the default.
Here's a basic rundown of the different play modes:
- Play and Stop - 2-step ONLY: Audio will start at the beginning of the chunk and stop at the end of the chunk. This helps to ensure you are not adding or removing words and putting them in the wrong chunk. All words must stay in their proper chunks. Make sure you are always editing in the highlighted blue area.
- Play and Loop - 2-step ONLY: Audio will play the same chunk in an endless loop.
- Continuous playing - 2-step ONLY: Audio will keep playing and not stop between chunks. If your cursor is not in the correct chunk, it will highlight in pink.
- Non-interactive playing - Universal: Audio play will have no interaction with the different chunks. If you experience problems with your player or cursor jumping around, please switch to this mode.
Audio Player

The audio player contains the following features:
Play/Pause: Clicking the Play/Pause button will start or stop the audio. After pausing, when you click Play (or use the hotkeys), the audio will backtrack 1 second before resuming. If your file comes with a video, the audio will NOT jump back 1 second as long as you are actively playing the video.
Rewind and Fast Forward: Clicking the Rewind and Fast Forward buttons or hotkeys will set the audio 5 seconds back or ahead, respectively.
Audio speed: This indicates the speed at which the audio is playing. Use the hotkeys to slow down and speed up the audio. When you slow it down, the speed will display as 0.9x down to 0.5x (90% to 50% of audio's original speed, respectively). Increasing the speed will show 1.1x up to 1.5x (110% to 150% of original speed).
Volume: You can control the volume by clicking the volume bar or icons on the Audio Player. For poor-quality audio, turning down the hub's volume and turning up your headset's volume can help clear up hard-to-hear speech.
Foot Pedal indicator: We highly recommend using a foot pedal, especially for 1-step QAing. Once your foot pedal is properly installed and ready to use, the foot pedal icon in the left of the Audio Box will turn green. If the hub does not recognize your pedal or one is not installed, the icon will be gray.
Video: Clients usually upload audios as mp3 files. However, if a file was uploaded as an mp4 video, you will see an orange Play icon in the right of the Audio Player box. Click it to open the video. If you click the video icon and, after several seconds, all you see is a black screen, or if you click it and nothing happens, there is likely no accompanying video, or it has not loaded properly. You can always submit a HelpDesk ticket to be sure. Remember, as mentioned above, while actively playing the video, the audio will not backtrack 1 second when you pause/play.
Note: Slides, captions, and other video content can be useful in gaining context to understand the speakers. However, we are creating a transcript of the words spoken, not a record of the video itself. Always follow the Style Guide rather than formatting your text to match what appears on the screen.
QA Guidelines
This is where you will see a specific Style Guide for each session you work on. ALWAYS check the QA Guidelines before working on a file. See QA Style Guidelines for further details on QA style and formatting expectations.
Hotkeys and Snippets
The hub has built-in hotkeys for quick and easy audio control. We strongly recommend keeping the default hotkeys unchanged; however, should you wish to customize them, you may do so by clicking Hotkeys beneath the QA Guidelines and following the directions. DO NOT use Ctrl + Space as a hotkey, as this combination creates a special type of timestamp that can be very hard to delete.
The hub also has built-in snippets, a.k.a. text expanders, that we highly recommend using to decrease finger and wrist fatigue and increase your productivity. Check out our Snippet How-To Guide for details on setting up and using snippets.
Saving a Session
We do not expect our QAs to complete every file in one sitting. We strongly encourage taking frequent breaks, actually. The following section outlines how to save your session when you are ready for a break so that you have ample time to complete it without losing your work. Be sure to understand our Extension Guidelines, however, as this determines how long you can save a session.
Autosave
In the top left of the transcription text box, you will see a checkbox that says, "Enable autosave (saves every 5 minutes)." Always confirm that this box is checked. The system will automatically save your file every 5 minutes so that, if something should happen and you need to retrieve a previous edition of your work, you can do so using the Show History feature. This also ensures that your file, by being periodically saved, will remain assigned to you and continuously apply a 1-hour extension as long as you are active in the session. We do recommend clicking Save frequently just to be on the safe side.

The Self-Extension Dropdown
When you first commit to a session, a "Keep Session for _____" dropdown menu will appear in the bottom left of the session screen. The default save time is 1 hour.
Once you have completed at least 5 minutes of transcription/editing and timestamps, click on the dropdown menu, select your desired extension time for the file, and save the session. Click Save and a pop-up box will display the time remaining until your extension expires. See our Extension Guidelines for details.

Save and Save & Exit
The Save button will save your session and show you the amount of time remaining on your extension. If no extension is applied, your work will be saved for a minimum of 1 hour. We recommend saving frequently, especially before going into Preview mode and again before submitting to ensure all your changes stick.

Save & Exit will save your session and take you out of the Sessions screen. This option DOES NOT always show an accurate amount of time remaining on your extension, so before saving and exiting, first click the Save button. To return to your session, click on the Sessions tab and it will reopen your saved session. Note that, upon reopening the session, the audio player will revert to 00:00. If you do not timestamp the file as you go, be sure to make note of where you were in the audio so you may return to it quickly upon continuing the session.
If you are away from the session longer than your given extension time, when you return to your session you will see a message saying you have been unassigned from the file. If this happens and you have transcribed and timestamped the first 5 minutes of the file, please follow the Lost Sessions Policy to retrieve your session.
Internet Connectivity
If your internet connection is unstable at all, you may see a large orange pop-up while you are working stating that the system could not save your file. You can safely click to close this pop-up and continue working, BUT be aware that the system did not save your work nor apply the usual 1-hour extension to your session. If you receive these pop-ups repeatedly, you may need to check your internet connection or move to a better area to save your work and apply your extension.
Session Activity
Our system monitors whether or not you are actively working on a file. If you go 5 minutes without being active in the sessions screen, a giant orange pop-up will display that reads, You have been not active for 5 minutes. Please confirm you are working on the session. If you see the pop-up and don't want to leave the session screen, click I'm Here.
If you do not confirm your activity before the countdown times out, your session will be saved for you, but you will be booted from the session screen just as if you had clicked Save & Exit. Any extension that you have on the file will still apply, and if you have not extended the file it will remain in your queue for 1 hour from the time you were booted. The message in the orange box will tell you, in hub time, when the file will expire from your queue. To return to your session, simply click the Sessions tab again and continue working.

Preview Mode
The main session screen, with its blue background, is where you will directly transcribe, edit, and timestamp your text. There is also a Preview option which allows you to view the file more as the client will see it, which is not editable. We strongly recommend thoroughly proofreading in this mode before submitting your file.
Spell-Checking from Preview Mode
When you've completed your QA work, click Save, then click the Preview button at the bottom of the screen. It will open a new window with the document as the client sees it. From this window:
- 1
- Click the Copy to Clipboard button to copy your transcript. It may help to manually copy only 30-40 minutes of the transcript at a time for best results in your proofreading application.
- 2
- Open your word processing application (e.g., Word and/or Grammarly - if you click on the green G for Grammarly, you can select New Document at the bottom to open the Grammarly Editor) and paste in your text. In Grammarly's editor, refreshing the page can help the application process longer blocks of text.
- 3
- Run a spell-check in your chosen application(s), with the appropriate settings (i.e., UK or US English).
- 4
- Back in your browser, click the Back to Session button to return to the QA screen. DO NOT click the back button on your browser, as you may lose your most recent changes to the file.
-
- 5
- Manually make your corrections, as highlighted by Word/Grammarly, directly into your session. You can do this by doing a Ctrl + F search in the sessions screen for each error (Cmd + F for Mac), then edit accordingly.
NEVER paste from Word or Grammarly into the WorkHub. Be sure to thoroughly spell-check every file before submitting it.
Note: Use your judgment when evaluating the results of a grammar check. We leave grammar as spoken. See the Style Guide for more details and examples.
Undoing Blunders
Mistakes happen. Maybe you accidentally changed two different speakers to the same ID, maybe you deleted an entire block of text, or maybe you randomly lost a large amount of timestamps. Whatever the case may be, if you catch the mistake immediately, do the following:
Undo
First, hit Ctrl + Z (Cmd + Z for Mac). This is the universal shortcut for Undo and usually helps. Ctrl + Y (Cmd + Y) is the universal shortcut for Redo in case you go too far.
New Tab
If undo doesn't work and you move quickly enough, open your session in a new tab. This new tab should show you the last automatic save. If your session pops up as it was before your blunder, close the original tab and save from the new one.
Show History
If these methods don't work, you can use the Show History link located at the top right of the session screen to restore a previous version of your work. The History feature records your session as it was at each save, either via the Autosave every 5 minutes or from clicking the Save button. This is one reason why selecting the Autosave option is particularly important. Click the Show History button, then click the most recent changes one by one, if necessary, to see which version of your session you will need to restore, then click Restore Changes. Voila!

Revert Entire Session
For 2-step files, if you haven't gone far in your work and/or you accidentally deleted a large block of text, it might be best to simply regenerate the original text. You can do this by selecting Re-generate transcriber text at the top of the screen. This feature will revert the session to the way it was when it first hit the Sessions queue. For 1-step files, this means the session will return to the blank orange box.
For 2-step files, all the transcribers' text will be restored and all timestamps erased. This feature will not regenerate selected chunks; it will regenerate the entire file.
