Speaker IDs
Speaker IDs are always assigned in the order that they speak in the file so that the number you use for the stamp corresponds with the speaker's position within the file. Having speaker IDs appear out of order in a file will count as an error in a review.
Speaker IDs
Automated and Recorded Voices
Stamping Speech Tags
Checking and Comparing Voices
Correcting a Speaker ID
The S? ID
Unison Group Response
Solid Block of Tags
Identifying Multiple Speakers
Tips for Stamping 10+ Speakers
Alt+0
Rename All
Speaker Names - Special Styles
Automated and Recorded Voices
Automated voices such as answering machines, AI voices, etc. get the same treatment as humans; each voice gets their own ID. This also means that a person's voice will have the same ID as their answering machine if both appear in the file. In a bizarre case where a speaker is actually talking over a recording of their own voice, the speaker ID will be the same, but each distinct strain of conversation - i.e., the voice and the recording - would get its own line.
Stamping Speech Tags
Remember the golden rule of transcription that each speaker gets their own line. This is especially important to understand as a QA because you will need to timestamp each speaker's respective speaker ID to everything they say. This same principle applies when representing their speech with a tag such as [inaudible], [crosstalk], [foreign], or the Guess tag.
In the below example, if S2 says something in the middle of S1's speech but you cannot make it out, then the [crosstalk] tag is placed on a new line (new speaker = new line) with a timestamp for S2, just as if you had understood their interjection. The [crosstalk] tag representing S2's speech DOES NOT go on S1's line.

Checking and Comparing Voices
Click on a timestamp to bring up the purple speaker's window. Each identified speaker will have a Play/Pause triangle and Forward/Back buttons in their respective rows. The Play button will play a sample of each speaker's voice to help you pick out the correct one. More specifically, it will play the audio from the time of the stamp up until the time of the next stamp. Cycle through each speaker's assigned snippets of audio by pressing the forward and back arrows.
Hint: If your first timestamp reads 00:00.000, the voice sample won't play when you open the speaker box!
Whichever timestamp you click on will display a solid orange block that says current next to its respective speaker. In this screenshot, the selected timestamp was S1 01:44.397. You can tell which timestamp you are actively listening to in the speaker box by the [time] indication, in this screenshot S2 05:37.622.

Use the forward and back buttons next to each speaker in this window to cycle through all of the timestamps you've marked for each given speaker, comparing the audio at each point to verify that you've picked the correct speaker ID. If you come across a voice that you know is out of place, note the speaker ID and time of the stamp, as well as which speaker it should be. Click outside of the speaker box to close it, go to your noted timestamp, and change the ID accordingly.
Correcting a Speaker ID
To change a speaker ID, click on the timestamp you wish to edit. When the purple box pops up, there are two ways you can change the ID:
- 1
- Type in the desired ID number into the white text box, hit rename, then click out of the speaker box to close it. You will have to do this if the ID you wish to change the stamp to has not already been assigned as a speaker, i.e., if you have a new speaker in the audio.
- 2
- For a quicker edit, if you have already assigned the desired ID elsewhere, click the orange person icon which corresponds to the speaker you want to change the ID to. For example, in this screenshot, the selected timestamp had an assignment of S2, but it needs to be S7. When the box opens, simply click the orange person next to the 7 and the ID will automatically change to S7 and close the speaker box simultaneously. This is much quicker than manually typing in the number, clicking rename, then closing out of the box.
-
- 3
- Alternatively, you could still erase the 2, type in 7, then hit rename, and the purple box will remain open. This is a better option if you want to compare voices before closing the speaker box.

The S? ID
You should make every effort to correctly identify each transcribable utterance in the session to its respective speaker. If, for some reason, you are not able to identify the speaker (such as for a short whisper or an inaudible comment), you can insert S?. This is done by using Ctrl + 0. Use this only as a last resort.
Unison Group Response
If you can make out the individual speakers, then please insert the text for each speaker and timestamp each one separately. This may mean having multiple lines of text that may even say the same thing.

In the case of a single group response where you cannot make out the individual speakers, you can insert the group response once and timestamp it with the S? ID.
Solid Block of Tags
S? is also used in Solid Block of Tags situations as described in the Style Guide where one tag represents multiple speakers. In that case, you would put the appropriate tag on its own line and stamp it with S?.
Identifying Multiple Speakers
Multispeaker files can be tricky, but they become easier with practice. Create a voice map in a notebook or on a separate program on your screen. As the different speakers are introduced or speak in a file, note the speaker IDs, names, places, and any identifying information you can about them, such as:
- Gender
- Distance from mic: This gets tricky if the speakers move around throughout the file
- Age: You can tell approximate age by speech habits, vocal quality
- Accents
- Vocal quality: Loud, quiet? Deep, high? Scruffy, clear? Resonant, nasally? Sound like a certain celebrity?
- Speech habits: Any words or phrases they use a lot? Fast, slow talker? Stutter or slur?
- Personal information: Kids, activities, location, companies, schools, pets, hobbies, etc.
- Personalities: Outspoken, soft-spoken, rude (interrupts others), polite, etc.
For example:
S2 Casey: Middle-aged female, bright/upbeat voice. Professor at UCLA. Sons named Jason and Todd.
S3 Todd: Casey's son. Medium-range voice, outspoken. Guffaws while talking. Backpacking fanatic.
It can be difficult to make absolute identification just by voices, but keeping notes goes a long way to at least making an educated guess. Make sure to destroy any type of personal information you have written down once you have completed the file.
Tips for Stamping 10+ Speakers
The hub's hotkeys will only allow you to directly insert IDs for speakers 1-9. For files with 10+ speakers, here are a couple of tricks to make your life easier.
Alt+0
To insert a speaker ID higher than 9, press Alt+0. This will insert a stamp and automatically open the purple speaker box, where you can type any number you need into the editor. Remember that once you have an ID already identified, you can easily change other IDs to that ID by clicking on the orange person icon next to the number. For example, once you have created an S10 ID, each time you press Alt+0 to open the box, simply click on S10's person to assign S10 to that timestamp and simultaneously close the speaker box.
Rename All
For high-speaker-count files in which you only have a few speakers active at a time (e.g., a university lecture), you can use the Rename All button to speed up your stamping. Be careful not to accidentally rename two speakers to the same ID, as you will be unable to separate them again except on a stamp-by-stamp basis. If you catch the error quickly, you can undo the change by using the Show History feature.
- 1
- Take two of your earlier speaker numbers that are no longer in common use, and use Rename All to convert them to a high number. For example, you could rename S1 and S2 to S51 and S52, respectively. This 'holds' those speakers while freeing up the Ctrl+1 and Ctrl+2 hotkeys.
- 2
- For a new speaker - let's say it's S14 - use the S1 ID. You can then use the S2 ID for your S15.
- 3
- When those speakers have finished, use Rename All to convert all of your S1 tags to S14 and all of your S2 tags to S15.
- 4
- When the file is complete, use Rename All one more time to put your S51 back to S1 and S52 back to S2.
Speaker Names - Special Styles
Note that timestamp names are ONLY used if noted in the Guidelines, NOT in the Description at the top of the session. Always check the QA Guidelines to make sure you are inserting the speaker IDs required for the file. Speaker Names files will usually be indicated in the Guidelines, most commonly as Male/Female or Professor/Student, Moderator/Participant, etc. In such cases, the timestamp editing box will display differently than normal. You will have an extra box at the bottom that says edit names.
Tip: Wait until just prior to submission to add the speaker names. Trying to change a speaker ID after having named them can cause issues.
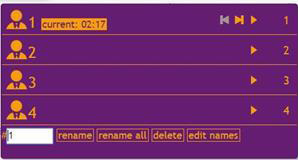
When you click on edit names, another box will open that will allow you to insert a name. Once you have input the names, remember to click Save. In the session, you will now see the speaker names instead of S1 or S2.


Remember to note which speaker ID belongs to each name; to insert the IDs you will still press Ctrl + 1 or 2, etc. (if you assign the names as you are working on the file, rather than waiting until before submission). So Tom would still be Ctrl + 1, Mary Ctrl + 2, etc. If, for some reason, you do not know the name then you can use the S1, S2 and so forth and you can change the name when it comes up in the file.
If you see the Edit Speakers box in a session that should not use speaker names according to the guidelines, or if it does not appear on a file that requires speaker names, please notify the Help Desk as soon as possible, and do not submit until you've received instructions from the Help Desk.
If speaker names are required for the session but you have not taken time to set the names for your speakers, then you will see numbers in place of the usual S1, S2, etc. in Preview mode. This is a clue that you need to return to the session, review the QA Guidelines, and look for your Edit Speakers' Names link to resolve the problem.
